Key takeaways
- Using high heat: It can damage shell coatings, synthetic fibers, elastic, and zipper components.
- Leaving the bag in direct sun all day: Short, indirect exposure is preferable to prolonged ultraviolet exposure.
- Hanging a soaked bag by one end: The water weight can strain seams and pull insulation downward.
- Wringing or twisting: Press and blot instead.
- Sealing it while damp: Waterproof dry bags are for protecting dry gear from water, not for storing wet insulation.
- Drying only the shell: Moisture trapped in baffles can remain for many hours after the outside feels dry.
- Using a top-loading agitator washer: If washing is necessary, follow the manufacturer’s instructions and use a large front-loader when permitted.
A wet sleeping bag is more than an inconvenience: trapped moisture can flatten insulation, create mildew, damage down’s loft, and leave you cold on the next night outdoors. Drying it incorrectly can be just as harmful. High heat may scorch synthetic fibers, melt coatings, shrink fabric, or damage a bag’s water-resistant finish. Wringing can break down delicate fill, while storing the bag even slightly damp can produce a musty odor that is difficult to remove.
The safest approach is gentle handling, plenty of airflow, and enough time for the insulation inside the bag to dry—not just the shell. The method below works for both down and synthetic sleeping bags, with a few important differences noted along the way.
Our top picks

As an Amazon Associate we earn from qualifying purchases at no extra cost to you. Ratings are shown as listed on Amazon.
What You Need
| Item | Why | Optional? |
|---|---|---|
| Clean, dry towels | Absorb surface water without twisting or compressing the insulation | No |
| Large drying rack, clothesline, or clean indoor floor space | Provides room to spread the sleeping bag into a thin layer | No, but one drying surface is essential |
| Box fan or circulating fan | Moves air across the fabric and shortens drying time | Yes, strongly recommended |
| Front-loading dryer | Can finish drying a machine-safe bag on low heat | Yes |
| Two or three clean dryer balls | Helps restore loft to down or synthetic fill in a dryer | Yes |
| Military Outdoor Clothing Previously Issued US GI OD Green Rubber Laundry Clothing Bag, about $16 to $20 | A ventilated, separate place to transport wet clothing and gear so moisture does not spread to a dry sleeping bag | Yes |
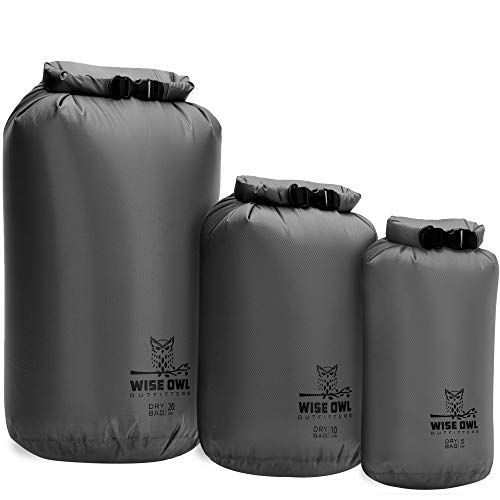
| Wise Owl Outfitters Waterproof Dry Bag 3-Pack, 5L/10L/20L, about $20 to $30 | Useful for keeping a dry bag protected from rain while traveling; do not seal a wet sleeping bag inside for storage | Yes |
Step-by-Step
-
Remove the sleeping bag from the wet environment (5 to 10 minutes)
Take the bag out of a tent, vehicle, pack, or waterproof sack as soon as possible. If it is raining, move under a roof or set up a clean indoor drying area. Open the zipper fully and remove any liner, clothing, or objects packed inside. Check the care label before using a dryer or washing machine.
Do not leave the bag tightly compressed. A wet bag packed in a stuff sack can develop odor and mildew quickly, especially in warm conditions.
-
Identify the source and amount of moisture (5 minutes)
Determine whether the bag is damp from condensation, soaked by rain, saturated from a spill, or wet from washing. Feel the hood, footbox, zipper area, and seams; these thicker or layered sections often hold moisture longest.
If only the shell is damp, air-drying may be enough. If the insulation feels heavy, clumpy, or cool throughout, plan on a longer drying process and frequent repositioning.
-
Blot without twisting or wringing (10 to 15 minutes)
Lay the bag flat on clean towels. Press another towel gently over wet sections, then lift and replace it as it becomes saturated. You can roll the bag loosely inside a towel and press down with your hands, but do not twist the roll.
Wringing can shift or break insulation, stress baffles, and stretch the shell fabric. Do not use a clothes dryer to remove large amounts of free water; a saturated bag can become very heavy and may be damaged as it tumbles.
-
Spread the bag in a shaded, well-ventilated area (30 minutes to several hours)
Lay the sleeping bag flat or drape it over a wide drying rack. Avoid narrow clotheslines or sharp railings that concentrate weight on a small section. Leave the zipper open and spread the hood, footbox, and draft collar as much as possible.
Choose a warm, dry room with moving air. Outdoor drying is fine in indirect sunlight, but avoid strong direct sun for extended periods because ultraviolet exposure can weaken fabric and fade the shell. Keep the bag away from radiators, wood stoves, heat vents, and space heaters.
-
Turn and redistribute the insulation (every 30 to 60 minutes)
Turn the bag over regularly so both sides receive airflow. For down bags, gently massage clumps apart with your fingertips. Do not shake the bag aggressively. Synthetic insulation may feel more evenly distributed, but it still needs attention around the footbox and corners.
A lightly damp bag may dry in 4 to 8 hours under good indoor airflow. A thoroughly soaked bag commonly takes 12 to 24 hours, and a humid room may require longer. Do not judge dryness by the shell alone; squeeze the center of each baffle and inspect the loft.
-
Use a dryer only if the care label permits it (30 minutes to 2 hours)
A large front-loading commercial dryer is usually safer than a small household dryer because the bag has more room to tumble. Use the lowest heat setting, generally no higher than warm or about 100 to 120°F. Never use high heat unless the manufacturer specifically permits it.
Add two or three clean dryer balls to help separate clumps. Stop the cycle every 20 to 30 minutes, remove the bag, and gently break up any packed insulation. Down often needs several low-temperature cycles. If the outer fabric feels hot rather than mildly warm, stop the dryer and switch to air-drying.
Do not use a dryer if the bag has a damaged shell, melting components, glued seams that are lifting, or a care label that prohibits machine drying.
-
Confirm that the inside is completely dry (15 to 20 minutes)
Check several locations, including the middle of the torso, hood, footbox, and along the zipper. The fill should feel light and springy rather than cold, heavy, lumpy, or damp. Down should regain consistent loft; synthetic fill should not contain compressed wet spots.
Place the dry bag in a warm room for another hour if you are uncertain. Smell it before packing. A musty odor is a sign that moisture remains or that mildew has begun to develop.
-
Store it loosely (5 minutes)
Once fully dry, place the sleeping bag in its large storage sack or hang it in a dry closet. Do not store it long-term in a tightly compressed stuff sack or waterproof dry bag. Compression damages loft over time, and an airtight container can trap unnoticed moisture.
Mistakes to Avoid
- Using high heat: It can damage shell coatings, synthetic fibers, elastic, and zipper components.
- Leaving the bag in direct sun all day: Short, indirect exposure is preferable to prolonged ultraviolet exposure.
- Hanging a soaked bag by one end: The water weight can strain seams and pull insulation downward.
- Wringing or twisting: Press and blot instead.
- Sealing it while damp: Waterproof dry bags are for protecting dry gear from water, not for storing wet insulation.
- Drying only the shell: Moisture trapped in baffles can remain for many hours after the outside feels dry.
- Using a top-loading agitator washer: If washing is necessary, follow the manufacturer’s instructions and use a large front-loader when permitted.
How Often
Dry a sleeping bag after every trip if it feels damp, smells musty, or has absorbed sweat or condensation. Even when it seems dry, air it out uncompressed for at least several hours after camping. For frequent use, wash the bag only as often as the care label recommends—typically when it is visibly dirty, noticeably oily, or no longer lofting properly. Overwashing can shorten its useful life.
During a multi-day trip, open the bag fully each morning and drape it in shade while you pack. Ten to 30 minutes of airflow can prevent small amounts of condensation from accumulating night after night.
When to Call a Pro or Replace
Consult a professional cleaner experienced with down or technical outdoor gear if the bag has been soaked in salt water, sewage, fuel, chemicals, or heavily contaminated floodwater. A cleaner can also help with persistent mildew, severe odors, or large areas of damaged insulation.
Consider repair before replacement when the problem is a small tear, broken zipper slider, or loose seam. Replacement may make more sense when the fill has permanently collapsed, baffles are separating, the shell coating is flaking across a large area, or the bag remains cold and lumpy after thorough cleaning and drying. If the bag no longer provides adequate warmth for the conditions, do not rely on it for an overnight trip.
FAQ
Can I dry a sleeping bag in the sun?
Yes, briefly and in indirect or mild sunlight. Strong direct sun can degrade fabric and coatings. Shade, airflow, and a low-humidity location are safer for extended drying.
How do I dry a down sleeping bag?
Blot it gently, spread it out, and use a low-heat dryer only if the care label allows it. Pause every 20 to 30 minutes to separate clumps. Down may require multiple cycles and must be completely dry before storage.
How long does a wet sleeping bag take to dry?
A slightly damp bag may dry in 4 to 8 hours with good airflow. A soaked bag can take 12 to 24 hours or more. Humidity, insulation type, bag thickness, and airflow all affect the timing.
Can I pack a wet sleeping bag in a waterproof dry bag?
Only for short transport to a drying location. Do not leave it sealed there. Open the dry bag as soon as possible, remove the sleeping bag, and begin drying; trapped moisture encourages mildew and odor.