Stepping up to a highball problem or testing your limits on a steep compression boulder requires more than just physical conditioning; it demands absolute confidence in your landing zone. A bouldering crash pad is the single most important safety investment you will make as a climber, acting as the literal buffer between a successful send and a trip to the emergency room. Yet, with countless options flooding the market, walking into a gear shop or browsing online can quickly become overwhelming.
Navigating the nuances of foam density, suspension systems, and hinge designs requires looking past flashy marketing and focusing on structural integrity. Whether you are building out a home circuit setup or preparing for a remote alpine bouldering trip, understanding the core specifications will help you filter out the noise and select a pad that genuinely protects your joints while surviving years of heavy abuse in the dirt.
As an Amazon Associate we earn from qualifying purchases at no extra cost to you.
Understanding Foam Construction: Open-Cell Versus Closed-Cell
The core of any crash pad is its foam, and the way manufacturers layer this foam dictates how safely you will absorb a fall. High-end pads utilize a multi-layer sandwich construction consisting of an upper layer of open-cell foam and a lower layer of closed-cell polyethylene foam. The open-cell top layer acts as the initial impact dissipater, compressing softly to catch your momentum without feeling jarringly stiff.
Beneath that soft top layer sits the closed-cell foam. This denser, firmer layer prevents you from bottoming out when taking a high fall onto rocks, roots, or uneven terrain. Avoid pads that rely solely on a single slab of cheap, uniform foam; they tend to pack out quickly, losing their protective qualities within a single season of heavy use.
Sizing and Coverage: Surface Area Versus Portability
Crash pads generally fall into three size categories: small sit-start pads, standard models, and large monster pads. Your primary climbing style should dictate your choice. If you frequently hike deep into alpine zones alone, a massive pad will become a physical burden, draining your energy before you even touch the rock. Conversely, if you climb with a crew, you can coordinate standard and large pads to cover complex landing zones effectively.
Standard pads offer the best balance of coverage and transportability for the average weekend warrior. However, if you love highball problems or erratic boulder fields with jagged rocks poking through, scaling up to a larger surface area or utilizing multiple smaller pads stacked strategically is non-negotiable for true safety.
Thickness Matters: Low-Profile Versus High-Volume Landings
Pad thickness typically ranges from three to five inches. While thicker pads naturally promise better impact absorption, they also add weight and bulk to your loadout. A three-inch pad is often sufficient for low-angle problems, sit starts, and technical slabs where ground clearance isn’t a massive hazard.
For roof problems, overhangs, and heights exceeding ten feet, a four-to-five-inch pad is strongly recommended. Keep in mind that thickness means little if the foam density is poor. A well-engineered three-inch sandwich pad can often outperform a thick, poorly layered cheap pad that lacks a rigid closed-cell base layer.
Hinged Versus Taco Style: Durability and Crease Prevention
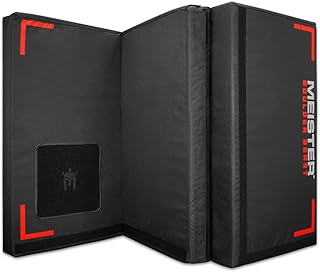
How a pad folds for transport is a major factor in its long-term durability. Hinged pads feature a clean fold down the middle, often held together by a fabric flap. They fold up like a suitcase, making them exceptionally easy to pack with gear stuffed inside them. The downside is the hinge crease; over time, foam can separate slightly right at the fold, creating a potential snag hazard or a soft spot where an ankle could twist if you land squarely on the seam.
Taco-style pads lack a physical break in the foam, folding smoothly over themselves. This eliminates the dreaded middle crease entirely, providing a uniform landing surface across the entire pad. The trade-off is that they are harder to stuff with gear, tend to be bulkier to strap to your back, and spring open with more force when you unbuckle them.
Carrying Systems: Suspension and Backpack Straps
A crash pad is only as good as its carry system, especially when you face a steep, hour-long approach trail. Look for pads featuring robust, padded shoulder straps, a supportive hip belt, and a load-lifter system. Without a proper waist belt, the weight of the pad will pull backward, straining your lower back and making the hike miserable.
Durability of the exterior shell is equally critical. Ballistic nylon shells with reinforced corners withstand being dragged across sharp rocks, grit, and mud far better than lightweight polyester alternatives. Additionally, check for a flap or cover that conceals the suspension system while you are climbing, preventing the shoulder straps from getting snagged or muddy when the pad rests on the ground.
The Danger of Cheap Materials and Common Buying Mistakes
One of the most common mistakes beginners make is buying the cheapest pad available online without checking the construction specs. Bargain pads often cut corners by using low-density open-cell foam throughout, which compresses instantly upon impact and offers zero protection against rocks hiding beneath the surface.
Another frequent misstep is ignoring the closure system. Flimsy plastic buckles and thin webbing straps fail under tension when you try to overstuff your pad with climbing shoes, chalk bags, and layers. Invest in heavy-duty metal or high-grade composite buckles that can handle high-torque tension season after season.
When It Is Actually Worth Spending More
Premium crash pads often command a hefty price tag, but that extra cost usually translates to proprietary foam technology, superior ballistic fabrics, and thoughtful modular features. If you climb regularly, push your grade on tall commitments, or travel frequently to abrasive sandstone and granite venues, spending more on a reputable brand pays off exponentially.
High-end pads retain their structural integrity, foam resilience, and water-resistance far longer than budget alternatives. Treating a quality crash pad as a multi-year investment protects your body and saves you from replacing a degraded, unsafe pad prematurely.
Related Guides
To deepen your gear research and compare top-performing models currently on the market, check out our expert analysis in the Best Bouldering Crash Pads in 2026: Compared and Ranked guide. For complementary options that excel in specific terrain profiles, you can also review our picks in the Best Bouldering Pads in 2026: Compared and Ranked lineup to ensure your complete landing zone is fully optimized.
FAQ
How often should I replace my bouldering crash pad?
A quality pad typically lasts between three to five years depending on frequency of use and storage conditions. If you notice the foam permanently compressed, sagging in the middle, or the outer shell heavily torn, it is time for a replacement.
Can I store gear inside my crash pad during hikes?
Yes, hinged and taco pads alike can easily swallow shoes, chalk buckets, and extra layers during your walk-in. However, avoid overstuffing the pad so tightly that it warps the foam structure or stresses the closure buckles.
How do I clean and maintain my crash pad?
Brush off loose dirt and scrub stubborn mud spots using warm water, mild soap, and a soft-bristle brush. Always air dry the pad completely in a shaded area before storing it to prevent mold growth on the fabric.
Are bigger pads always better for solo climbers?
Not necessarily, as a massive pad can be overwhelmingly heavy and awkward to hike with when you are climbing alone. Balance your need for coverage with your physical capacity to comfortably carry the load over rugged trails.