Key takeaways
- Flushing in the normal direction: That can push debris farther into the membrane instead of removing it.
- Using excessive pressure: A squeeze pouch should be pressed gradually. Stop if the connection bulges, leaks, or feels unusually resistant.
- Using hot or freezing water: Heat may deform components, while freezing can create internal cracks that are not visible from the outside.
- Using soap inside the filter: Detergent residue can affect taste and may damage the membrane.
- Touching the clean outlet: Keep hands, dirty hoses, and the receiving bucket away from the clean-water port.
- Storing it wet: Trapped moisture can lead to odors and microbial growth.
- Ignoring leaks or poor flow: A faster flow rate is not useful if the filter has a split housing or an internal bypass.
A squeeze water filter can slow to a trickle when sediment, algae, and fine debris collect inside its hollow-fiber membrane. Backflushing reverses the normal flow of water to push that buildup out. Done correctly, it restores flow and helps extend the filter’s service life. Done badly, it can force dirty water deeper into the membrane, damage the filter, or leave behind bacteria and unpleasant tastes.
This guide explains how to backflush a squeeze water filter safely, including Sawyer-style systems such as the SP129. The same general method works for many portable hollow-fiber filters, but always check your filter’s care instructions first. The process takes only a few minutes and requires no electricity—just clean water, a compatible connection, and gentle pressure.
Our top picks
 Sawyer Products SP129 Squeeze Water Filtration System
- Product Group: Outdoors
- Binding: Sports
As an Amazon Associate we earn from qualifying purchases at no extra cost to you. Ratings are shown as listed on Amazon.
What You Need
| Item | Why | Optional? |
|---|---|---|
| Clean water | Flushes sediment and debris out of the filter in the reverse direction. Use potable water when possible. | No |
| Filter’s clean-water outlet cap | Helps keep the outlet sanitary after cleaning and drying. | No, if supplied with your filter |
| Backflush syringe or clean squeeze pouch | Provides controlled pressure for reverse flushing. A 32-ounce pouch is a common size. | No |
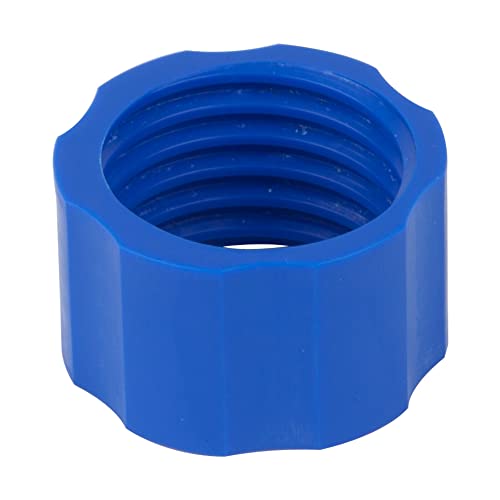
| Sawyer SP150 Coupling | Connects a compatible squeeze pouch directly to the filter’s clean-water end for backflushing. It measures about 1 x 1 x 1 inch. | Yes, if your filter includes another backflush method |
| Small bowl or bucket | Catches cloudy water and makes it easier to see when the flush runs clear. | Yes |
| Unscented household bleach | May be used for storage sanitizing when the manufacturer permits it. Follow the filter maker’s dilution instructions. | Yes |
| Replacement filter or complete kit | A worn or damaged membrane cannot be restored by backflushing. A Sawyer SP129 kit typically costs about $40 to $55, depending on the seller and included accessories. | Yes |
A compatible Sawyer coupling generally costs about $7 to $10, while a complete squeeze-filter kit with two 32-ounce pouches, a straw, and a hydration-pack adapter commonly falls in the $40 to $55 range. Prices change, so treat those figures as shopping estimates rather than fixed prices.
Step-by-Step
1. Identify the normal flow direction (1 minute)
Look for arrows, “dirty” and “clean” labels, or the threaded ends on the filter. During normal use, water travels from the source pouch or bottle through the filter and out the clean-water side. Backflushing reverses that direction: clean water must enter through the clean-water outlet and leave through the dirty-water inlet.
If the filter has removable hoses, disconnect them before cleaning. Keep the dirty side away from the clean side and from drinking containers. Cross-contamination is one of the most common problems with portable filters.
2. Prepare clean water and the receiving container (2 minutes)
Fill a clean pouch, bottle, or container with potable water. Room-temperature water is the safest choice. Avoid boiling water, very hot tap water, carbonated liquids, detergents, and flavored beverages unless the manufacturer specifically approves them. Heat and chemicals can damage the membrane or leave residue.
Place a bowl or bucket under the filter’s normal dirty-water inlet. The first water expelled may be gray, brown, or contain visible particles. Do not drink it, and do not let it splash onto the clean side of the filter.
3. Connect the backflush setup (2 minutes)
Attach a clean squeeze pouch, syringe, or bottle to the filter’s clean-water end. If you are using a Sawyer-style coupling, screw the coupling onto the filter and then attach the pouch or bottle securely. Check that the connection is straight and snug, but do not overtighten plastic threads.
Keep the filter supported rather than allowing the full weight of a filled pouch to hang from the connection. A filled 32-ounce pouch holds about 2 pounds of water, and repeated strain can stress a small fitting or threaded connection.
4. Push clean water through in reverse (3 to 5 minutes)
Slowly squeeze the pouch or operate the syringe so water flows backward through the filter. Use steady, moderate pressure—not a sudden blast. With a pouch, press with both hands and pause every few seconds. If the filter has a recommended pressure limit, stay below it.
Watch the water leaving the opposite end. It may initially look cloudy or contain specks. Continue with several short flushes rather than forcing one large volume through at once. For a portable hollow-fiber filter, approximately 16 to 32 ounces per cycle is a practical starting point, but the exact amount depends on how clogged the filter is and the manufacturer’s instructions.
If water will not pass at all, stop squeezing. A blocked connection, closed cap, kinked hose, or incorrect flow direction may be the cause. Excessive pressure can damage the membrane without solving the blockage.
5. Repeat until the discharge improves (2 to 5 minutes)
Refill the pouch or syringe and repeat the reverse flush. Rotate or gently shake the filter between flushes if its instructions allow it; do not drop it or strike it against a hard surface. The outgoing water does not need to be perfectly laboratory-clear, but it should become noticeably cleaner and the filter should regain a more useful flow rate.
Do not judge success only by appearance. A filter can look clean while still having a damaged membrane, and clear water is not proof that the filter is safe if it has been frozen, cracked, or mishandled.
6. Rinse, drain, and dry the filter (5 minutes, plus drying time)
Disconnect the pouch and rinse the exterior of the filter and fittings with clean water. Hold the filter so water can drain from the ports. Follow the manufacturer’s instructions for drying; many portable filters should be allowed to air-dry completely before long-term storage.
Keep protective caps on the appropriate ends, but do not seal in moisture if the instructions call for an open-air drying period. Store the dry filter in a clean, cool place away from direct sunlight, freezing temperatures, fuels, and household chemicals. Drying may take several hours or overnight depending on humidity.
7. Sanitize before extended storage, if approved (5 minutes)
Some filters can be treated with a very dilute, unscented bleach solution before storage. Use only the concentration and procedure specified by the manufacturer; bleach strength varies, and too much can damage components or leave an odor. Never mix bleach with vinegar, ammonia, or other cleaners.
After sanitizing, flush with the required amount of clean water and allow the filter to dry as directed. If your filter’s manual does not mention bleach, do not improvise a chemical cleaning method.
Mistakes to Avoid
- Flushing in the normal direction: That can push debris farther into the membrane instead of removing it.
- Using excessive pressure: A squeeze pouch should be pressed gradually. Stop if the connection bulges, leaks, or feels unusually resistant.
- Using hot or freezing water: Heat may deform components, while freezing can create internal cracks that are not visible from the outside.
- Using soap inside the filter: Detergent residue can affect taste and may damage the membrane.
- Touching the clean outlet: Keep hands, dirty hoses, and the receiving bucket away from the clean-water port.
- Storing it wet: Trapped moisture can lead to odors and microbial growth.
- Ignoring leaks or poor flow: A faster flow rate is not useful if the filter has a split housing or an internal bypass.
How Often
Backflush after each trip or whenever the flow becomes noticeably slower. If you filter silty lake water, muddy stream water, or water with visible particles, clean the filter during the trip as soon as performance drops. Backflush before storing the filter for more than a few days, then sanitize and dry it if the manufacturer recommends that procedure.
Pre-filtering dirty water through a bandana, coffee filter, or purpose-made sediment screen can reduce clogging, but it does not replace backflushing. A pre-filter should not be treated as a substitute for disinfecting water when your system requires chemical treatment or boiling.
When to Call a Pro or Replace
Portable squeeze filters are generally user-serviceable, so professional repair is uncommon. Replace the filter if the housing is cracked, the membrane has frozen, the clean side has been contaminated with untreated water and cannot be sanitized according to the instructions, or the filter still has very poor flow after thorough backflushing.
Also replace it if water passes unusually easily with little resistance, especially after physical damage. A sudden increase in flow can indicate a ruptured membrane, which may allow microorganisms through. Do not rely on taste, smell, or appearance to confirm filtration performance.
FAQ
Can I backflush a squeeze water filter with tap water?
Yes, clean tap water is usually appropriate for backflushing. Use potable, room-temperature water and prevent the tap, faucet aerator, or dirty hose from touching the clean outlet. If your local tap water has an unusual chemical treatment, follow the filter manufacturer’s guidance instead.
How much water should I use?
Start with 16 to 32 ounces per reverse-flush cycle, then repeat as needed. The right amount depends on the filter’s design and how much sediment it contains. Several gentle cycles are safer than forcing a large volume through under high pressure.
Why is my filter still slow after backflushing?
The membrane may be heavily clogged, the hose may be kinked, or a cap or fitting may be restricting flow. Check the connections and repeat the process once. If flow remains poor, or if the filter has been frozen or dropped, replacement is safer than continued use.
Can I drink the water used for backflushing?
No. Reverse-flush water has traveled through the filter in the wrong direction and may contain concentrated sediment or contaminants from the dirty side. Discard it and use freshly treated water for drinking.